1. Introduction
In this tutorial, we will present how to create Spring Boot 2 application with the Angular in version 11 and MySQL database. The tutorial will cover the implementation of all layers: the backend, frontend, and database.
2. Architecture
In the application architecture we can distinguish three main layers:
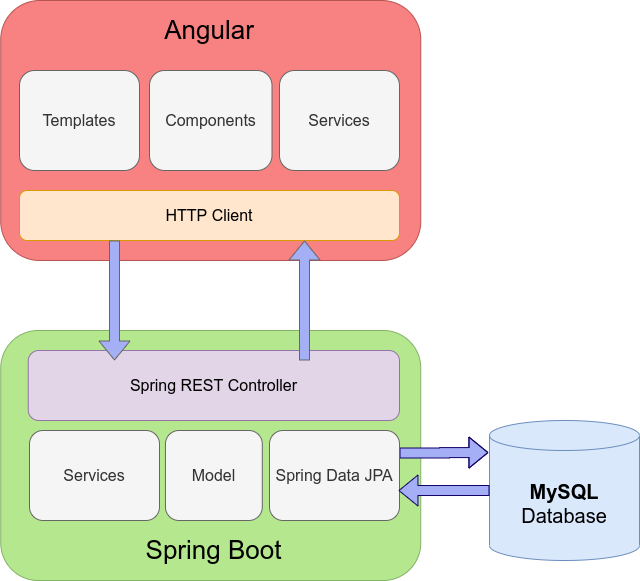
The communication between the front-end and back-end will be implemented using REST API. On the front-end side, we will have an HTTP Client and the back-end will be handling those HTTP requests using Spring REST Controller. The angular application on the front-end side will create a fully-functional user interface to manage posts (adding, edit, search). All data will be saved in the MySQL database, integrated with the application using Spring Data JPA.
3. Back-end
3.1. Technology stack
- Java 8
- Spring Boot 2.3.1.RELEASE,
- MySQL
- Maven 3.6.1
3.2. Project structure
Project will have the following structure:
├── pom.xml
└── src
    ├── main
    │   ├── java
    │   │   └── com
    │   │       └── frontbackend
    │   │           └── springboot
    │   │               ├── Application.java
    │   │               ├── controller
    │   │               │   └── PostsController.java
    │   │               ├── model
    │   │               │   └── Post.java
    │   │               ├── repository
    │   │               │   └── PostRepository.java
    │   │               └── service
    │   │                   └── PostService.java
    │   └── resources
    │       └── application.properties
Elements in project structure:
Post- is an entity class representingpoststable in Java application,PostRepository- an interface that extends Spring'sJpaRepositoryclass with CRUD operations onpoststable,PostsController- Spring controller used to handle HTTP requests from the Angular HTTP client,application.properties- the configuration file used by Spring Boot,pom.xml- Maven dependencies used in the application.
3.3. REST API Overview
The following REST calls will be provided by the Spring Boot application:
| URL | HTTP Method | Action |
| /posts | GET | Get list all created Posts |
| /posts?title={title} | GET | Get post list filtered by title |
| /posts | POST | Create new Post |
| /posts/{id} | GET | Get Post by provided id |
| /posts/{id} | DELETE | Delete Post by provided id |
| /posts/{id} | PUT | Update Post |
3.3. Setup the Spring Boot project
First, we need to create the pom.xml file have the following dependencies:
<?xml version="1.0" encoding="UTF-8"?>
<project xmlns="http://maven.apache.org/POM/4.0.0" xmlns:xsi="http://www.w3.org/2001/XMLSchema-instance"
         xsi:schemaLocation="http://maven.apache.org/POM/4.0.0 https://maven.apache.org/xsd/maven-4.0.0.xsd">
    <modelVersion>4.0.0</modelVersion>

    <groupId>com.frontbackend.springboot</groupId>
    <artifactId>angular11-spring-boot2-mysql</artifactId>
    <version>0.0.1-SNAPSHOT</version>

    <!-- Inherit defaults from Spring Boot -->
    <parent>
        <groupId>org.springframework.boot</groupId>
        <artifactId>spring-boot-starter-parent</artifactId>
        <version>2.3.1.RELEASE</version>
    </parent>

    <!-- Add typical dependencies for a web application -->
    <dependencies>
        <dependency>
            <groupId>org.springframework.boot</groupId>
            <artifactId>spring-boot-starter-web</artifactId>
        </dependency>
        <dependency>
            <groupId>org.springframework.boot</groupId>
            <artifactId>spring-boot-starter-data-jpa</artifactId>
        </dependency>
        <dependency>
            <groupId>mysql</groupId>
            <artifactId>mysql-connector-java</artifactId>
            <scope>runtime</scope>
        </dependency>
    </dependencies>

    <!-- Package as an executable jar -->
    <build>
        <plugins>
            <plugin>
                <groupId>org.springframework.boot</groupId>
                <artifactId>spring-boot-maven-plugin</artifactId>
            </plugin>
        </plugins>
    </build>
</project>
Dependencies used in this project:
spring-boot-starter-web- contains a web embedded container for Spring Boot applications,spring-boot-starter-data-jpa- Spring Data JPA dependency used for interaction with database,mysql-connector-java- MySQL database driver.
The latest versions of these dependencies could be found in the following links:
- org.springframework.boot : spring-boot-starter-web ,
- org.springframework.boot : spring-boot-starter-data-jpa ,
- mysql : mysql-connector-java .
3.4. Spring Boot configuration
The application.properties should be placed in src/main/resources folder, and contain the following properties:
spring.datasource.url= jdbc:mysql://localhost:3306/testdb?allowPublicKeyRetrieval=true&useSSL=false
spring.datasource.username=root
spring.datasource.password=mysql

spring.jpa.properties.hibernate.dialect=org.hibernate.dialect.MySQL5InnoDBDialect

# Hibernate ddl auto (create, create-drop, validate, update)
spring.jpa.hibernate.ddl-auto=update
Properties used in our configuration:
spring.datasource.usernameandspring.datasource.password- contains username and password used for database connection,spring.datasource.url- database connection URL string,spring.jpa.properties.hibernate.dialect- set MySQL dialectorg.hibernate.dialect.MySQL5InnoDBDialectto integrate with MySQL database,spring.jpa.hibernate.ddl-auto- parameter that control export schema DDL to the database - update - update the schema.
3.5. MySQL database
In order to create an MySQL database instance we can used docker commands:
First pull the latest MySQL docker image:
docker pull mysql
Then start docker with MySQL database in background:
docker run -d --name mysql-server -p 3306:3306 -e "MYSQL_ROOT_PASSWORD=mysql" mysql
3.6. Entity class
The entity class will contain the following fields:
- id - the autogenerated UUID that will be our primary key,
- title - contains post title,
- content - contains post content,
- published - published flag - true/false,
- tags - post tags.
package com.frontbackend.springboot.model;

import javax.persistence.Entity;
import javax.persistence.GeneratedValue;
import javax.persistence.Id;
import javax.persistence.Table;

import org.hibernate.annotations.GenericGenerator;

@Entity
@Table(name = "posts")
public class Post {

    @Id
    @GeneratedValue(generator = "uuid")
    @GenericGenerator(name = "uuid", strategy = "uuid2")
    private String id;

    private String title;

    private String content;

    private boolean published;

    private String tags;

    // getters and setters
}
The following annotations were used in the entity class:
@Entity- marks the class as a persistent Java object representing tablepostsfrom the database.@Table- a database table that this entity class will represent,@Id- indicates a primary key for this entity,@GenericGenerator- automatically generating id,@GeneratedValue- generation strategy for the primary key.
3.7. Post Request
JSON requests will be represent by the PostRequest object with the following structure:
package com.frontbackend.springboot.model;

public class PostRequest {

    private String title;
    private String content;
    private String tags;
    private boolean published;

    // setters and getters
}
3.8. Repository interface
The PostRepository that exteds JpaRepository is used for interactions with MySQL database. This object contains all CRUD methods like save(), delete(), findAll(), deleteById().
package com.frontbackend.springboot.repository;

import java.util.List;

import org.springframework.data.jpa.repository.JpaRepository;
import org.springframework.stereotype.Repository;

import com.frontbackend.springboot.model.Post;

@Repository
public interface PostRepository extends JpaRepository<Post, String> {

    List<Post> findAllByTitleContaining(String title);
}
We created a findAllByTitleContaining(...) method that will be reasponsible for searching posts by a specified title provided in GUI.
3.9. Service class
The PostService is used to create a separete layer between the data access object (PostRepository) and Rest Controller (PostsController):
package com.frontbackend.springboot.service;

import java.util.List;
import java.util.Optional;

import org.springframework.beans.factory.annotation.Autowired;
import org.springframework.stereotype.Service;

import com.frontbackend.springboot.model.Post;
import com.frontbackend.springboot.model.PostRequest;
import com.frontbackend.springboot.repository.PostRepository;

@Service
public class PostService {

    private final PostRepository postRepository;

    @Autowired
    public PostService(PostRepository postRepository) {
        this.postRepository = postRepository;
    }

    public Optional<Post> findById(String id) {
        return postRepository.findById(id);
    }

    public void changePublishedFlag(String id, PostRequest request) {
        Optional<Post> post = findById(id);
        if (post.isPresent()) {
            Post p = post.get();
            p.setPublished(request.isPublished());
            postRepository.save(p);
        }
    }

    public String save(PostRequest request) {
        Post post = new Post();
        post.setTitle(request.getTitle());
        post.setContent(request.getContent());
        post.setPublished(false);
        post.setTags(request.getTags());

        return postRepository.save(post)
                             .getId();
    }

    public void update(String id, PostRequest request) {
        Optional<Post> post = findById(id);
        if (post.isPresent()) {
            Post forUpdate = post.get();
            forUpdate.setContent(request.getContent());
            forUpdate.setTitle(request.getTitle());
            forUpdate.setTags(request.getTags());
            postRepository.save(forUpdate);
        }
    }

    public List<Post> getAll() {
        return postRepository.findAll();
    }

    public List<Post> findByTitle(String title) {
        return postRepository.findAllByTitleContaining(title);
    }

    public void delete(String id) {
        Optional<Post> post = findById(id);
        post.ifPresent(postRepository::delete);
    }
}
3.10. REST Controller
The PostsController is a Spring REST controller used to handle HTTP requests. Root endpoint will start with /api/posts URI.
package com.frontbackend.springboot.controller;

import java.util.List;
import java.util.Optional;

import org.springframework.beans.factory.annotation.Autowired;
import org.springframework.http.ResponseEntity;
import org.springframework.util.StringUtils;
import org.springframework.web.bind.annotation.CrossOrigin;
import org.springframework.web.bind.annotation.DeleteMapping;
import org.springframework.web.bind.annotation.GetMapping;
import org.springframework.web.bind.annotation.PathVariable;
import org.springframework.web.bind.annotation.PostMapping;
import org.springframework.web.bind.annotation.PutMapping;
import org.springframework.web.bind.annotation.RequestBody;
import org.springframework.web.bind.annotation.RequestMapping;
import org.springframework.web.bind.annotation.RequestParam;
import org.springframework.web.bind.annotation.RestController;

import com.frontbackend.springboot.model.Post;
import com.frontbackend.springboot.model.PostRequest;
import com.frontbackend.springboot.service.PostService;

@CrossOrigin(origins = "http://localhost:8081")
@RestController
@RequestMapping("/api/posts")
public class PostsController {

    private final PostService postService;

    @Autowired
    public PostsController(PostService postService) {
        this.postService = postService;
    }

    @GetMapping("{id}")
    public ResponseEntity<Post> post(@PathVariable String id) {
        Optional<Post> post = postService.findById(id);
        return post.map(ResponseEntity::ok)
                   .orElseGet(() -> ResponseEntity.notFound()
                                                  .build());
    }

    @GetMapping
    public List<Post> list(@RequestParam(required = false) String title) {
        if (StringUtils.isEmpty(title)) {
            return postService.getAll();
        }
        return postService.findByTitle(title);
    }

    @PostMapping
    public String save(@RequestBody PostRequest request) {
        return postService.save(request);
    }

    @PutMapping("{id}/publish")
    public void publishUnpublish(@PathVariable String id, @RequestBody PostRequest request) {
        postService.changePublishedFlag(id, request);
    }

    @PutMapping("{id}")
    public void update(@PathVariable String id, @RequestBody PostRequest request) {
        Optional<Post> post = postService.findById(id);
        if (post.isPresent()) {
            postService.update(id, request);
        } else {
            postService.save(request);
        }
    }

    @DeleteMapping("{id}")
    public void delete(@PathVariable String id) {
        postService.delete(id);
    }
}
We used here some interesting annotations that need a little explanation:
@RestControllerused to identify a class as a REST controller,@CrossOriginthat allows cross-domain requests,@RequestMappingto connect a specific endpoint with this particular class.
4. Front-end
4.1. Project structure
├── package.json
├── package-lock.json
├── README.md
├── src
│   ├── app
│   │   ├── app.component.css
│   │   ├── app.component.html
│   │   ├── app.component.ts
│   │   ├── app.module.ts
│   │   ├── app-routing.module.ts
│   │   ├── components
│   │   │   ├── post-form
│   │   │   │   ├── post-form.component.html
│   │   │   │   └── post-form.component.ts
│   │   │   └── post-list
│   │   │       ├── post-list.components.html
│   │   │       └── post-list.component.ts
│   │   ├── model
│   │   │   └── post.model.ts
│   │   └── services
│   │       └── post.service.ts
│   ├── favicon.ico
│   ├── index.html
│   ├── main.ts
│   ├── polyfills.ts
│   └── styles.css
Angular application contains the following elements:
post-form- andpost-listcomponents,post.service- with HTTP client for communication with Spring Boot Restful application,post.model- JavaScript object that represents Post in Java application,app.module- the main Angular module withFormsandHttpClientangular modules imported,app.routing.module- contains route configuration - connect URL with specific Angular component.
In order to generate Angular initial application we need to run the following commands:
> ng new angular --minimal
With the --minimal flag ng will create a minimal workspace without testing framework.
Next, we need to create the service and GUI components:
> ng g s services/post
> ng g c components/post-form
> ng g c components/post-list
4.2. Model
The model object will represent a Post:
export class Post {
  id?: any;
  title?: string;
  content?: string;
  tags?: string;
  published?: boolean;
}
4.2. Post service
The PostService is responsible for communication with Spring Boot REST API:
import { Injectable } from '@angular/core';
import { HttpClient } from '@angular/common/http';
import { Observable } from 'rxjs';
import { Post } from '../model/post.model';

const baseUrl = 'http://localhost:8080/api/posts';

@Injectable({
  providedIn: 'root'
})
export class PostService {

  constructor(private http: HttpClient) {
  }

  list(): Observable<any> {
    return this.http.get(baseUrl);
  }

  get(id: string): Observable<any> {
    return this.http.get(`${baseUrl}/${id}`);
  }

  create(data: Post): Observable<any> {
    return this.http.post(baseUrl, data);
  }

  update(id: string, data: Post): Observable<any> {
    return this.http.put(`${baseUrl}/${id}`, data);
  }

  publishUnpublish(id: string, data: Post): Observable<any> {
    return this.http.put(`${baseUrl}/${id}/publish`, data);
  }

  delete(id: string): Observable<any> {
    return this.http.delete(`${baseUrl}/${id}`);
  }

  findByTitle(title: string): Observable<any> {
    return this.http.get(`${baseUrl}?title=${title}`);
  }
}
4.2. Post list component
Post list component will be presenting a list of posts. The details will be presented on the right panel when post will be selected on the list.
import { Component, OnInit } from '@angular/core';
import { Post } from '../../model/post.model';
import { PostService } from '../../services/post.service';
import { ActivatedRoute } from '@angular/router';

@Component({
  selector: 'app-post-list',
  templateUrl: './post-list.components.html'
})
export class PostListComponent implements OnInit {

  posts?: Post[];
  selected?: Post;
  currentIndex: number = -1;
  title: string = '';
  message: string = '';

  constructor(private postService: PostService, private route: ActivatedRoute) {
  }

  ngOnInit(): void {
    this.route.queryParams
      .subscribe(params => {
          if (params.title) {
            this.getPostsByTitle(params.title);
          } else {
            this.getPosts();
          }
        }
      );
  }

  getPostsByTitle(title: string): void {
    this.postService.findByTitle(title)
      .subscribe(
        data => {
          this.posts = data;
        },
        error => {
          console.error(error);
        });
  }

  getPosts(): void {
    this.postService.list()
      .subscribe(
        data => {
          this.posts = data;
        },
        error => {
          console.error(error);
        });
  }

  refreshList(): void {
    this.getPosts();
    this.selected = undefined;
    this.currentIndex = -1;
  }

  setSelected(post: Post, index: number): void {
    if (this.selected && this.selected.id == post.id) {
      this.selected = undefined;
      this.currentIndex = -1;
    } else {
      this.selected = post;
      this.currentIndex = index;
    }
  }

  searchTitle(): void {
    this.selected = undefined;
    this.currentIndex = -1;

    this.postService.findByTitle(this.title)
      .subscribe(
        data => {
          this.posts = data;
        },
        error => {
          console.error(error);
        });
  }

  deletePost(): void {
    if (!this.selected) {
      return;
    }

    this.postService.delete(this.selected.id)
      .subscribe(
        response => {
          this.refreshList();
        },
        error => {
          console.error(error);
        });
  }

  updatePublished(status: boolean): void {
    if (!this.selected) {
      return;
    }

    const data = {
      id: this.selected.id,
      published: status
    };

    this.message = '';

    this.postService.publishUnpublish(this.selected.id, data)
      .subscribe(
        response => {
          if (this.selected) {
            this.selected.published = status;
          }
        },
        error => {
          console.error(error);
        });
  }
}
4.2. Post form component
Post form component will be used to create new posts and also edit an existing one.
import { Component, OnInit } from '@angular/core';
import { PostService } from '../../services/post.service';
import { ActivatedRoute, Router } from '@angular/router';
import { Post } from '../../model/post.model';

@Component({
  selector: 'app-post-form',
  templateUrl: './post-form.component.html'
})
export class PostFormComponent implements OnInit {

  post: Post = {
    title: '',
    content: '',
    tags: '',
    published: false
  };
  message = '';

  constructor(
    private postService: PostService,
    private route: ActivatedRoute,
    private router: Router) {
  }

  ngOnInit(): void {
    this.message = '';
    const id = this.route.snapshot.params.id;
    if (id) {
      this.editPost(this.route.snapshot.params.id);
    }
  }

  editPost(id: string): void {
    this.postService.get(id)
      .subscribe(
        data => {
          this.post = data;
        },
        error => {
          console.error(error);
        });
  }

  savePost(): void {
    this.message = '';

    if (this.post.id) {
      this.saveEditedPost();
    } else {
      this.createNewPost();
    }
  }

  private createNewPost() {
    this.postService.create(this.post)
      .subscribe(
        response => {
          this.router.navigate([ '/posts' ]);
        },
        error => {
          console.error(error);
          this.message = 'An error occurred while saving post';
        });
  }

  private saveEditedPost() {
    this.postService.update(this.post.id, this.post)
      .subscribe(
        response => {
          this.router.navigate([ '/posts' ]);
        },
        error => {
          console.error(error);
          this.message = 'An error occurred while saving post';
        });
  }
}
5. Run and Test Application
To run back-end Spring Boot application server we need to run:
mvn spring-boot:run
or
java -jar target/angular11-spring-boot2-mysql-0.0.1-SNAPSHOT.jar
To start front-end application on a default port 4200 run:
ng serve
If the ng command is not found install it using npm (-g flag will install it globally):
npm install -g @angular/cli
Application presents the following functionality:
6. Conclusion
In this tutorial, we presented how to create a Spring Boot 2 application with Angular 11 integrated with MySQL database.
As usual, the code used in this tutorial is available in our GitHub repository.
{{ 'Comments (%count%)' | trans {count:count} }}
{{ 'Comments are closed.' | trans }}