1. Introduction
Spring Boot was designed to simplify the initial setup and development process of Spring applications. The framework uses a specific method (the convention over the configuration principle) for auto-configuration dependencies so that developers no longer need to define a boilerplate configuration. Fundamentally, it is a collection of libraries. You can use Spring Boot by importing the corresponding dependencies in a maven or Gradle project, and you don't need to manage the versions of these libraries yourself.
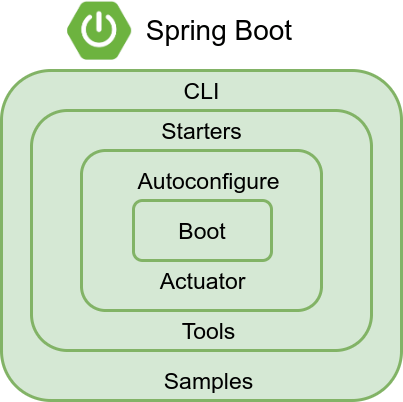
Spring Boot diagram:
2. Spring Boot features
There are many advantages of using Spring Boot.
The main ones are:
- with Spring Boot you can quickly create stand-alone, production-grade Spring-based projects and integrate them with mainstream frameworks,
- Spring Boot using embedded Servlet container, no need to create WAR packages anymore (you can create Java applications that can be started by using
java -jarcommand), - it provides a large number of automatic configurations to simplify development (default values could be also easily modified),
- XML configuration is no more required (Spring Boot supports annotations),
- no code generation,
- allows natural integration with cloud computing.
2. Microservice architecture
When speaking of Spring Boot, we need to mention microservices as they fit perfectly into this concept. Microservices are an architectural style where small services communicate with each other through HTTP (but the communication protocol is not directly specified, we could use whatever we want for communication). However, there is no official definition of microservices just a list of rules. The microservice architecture has many important advantages, and it solves the problem of complexity. It decomposes a single application into a set of services. Although the total amount of functionality remains the same, the application has been broken down into manageable modules or services. The development of microservices is much faster and easier to understand and maintain.
3. Developing Spring Boot Application
Let's start with a sample HelloWorld application that will be serving 'Hello World' text on http://localhost:8080/hello endpoint.
3.1. System Requirements
Spring Boot is a Java-based framework so we will need JDK installed. Spring Boot from version 2.5.0 requires a JDK in version 8. We will also need Maven or Gradle to build the project and start the Web server.
Things you will need:
- an IDE (we will use IntelliJ),
- JDK 8 or 11+ installed with JAVA_HOME configured appropriately,
- Apache Maven 3.6.2+.
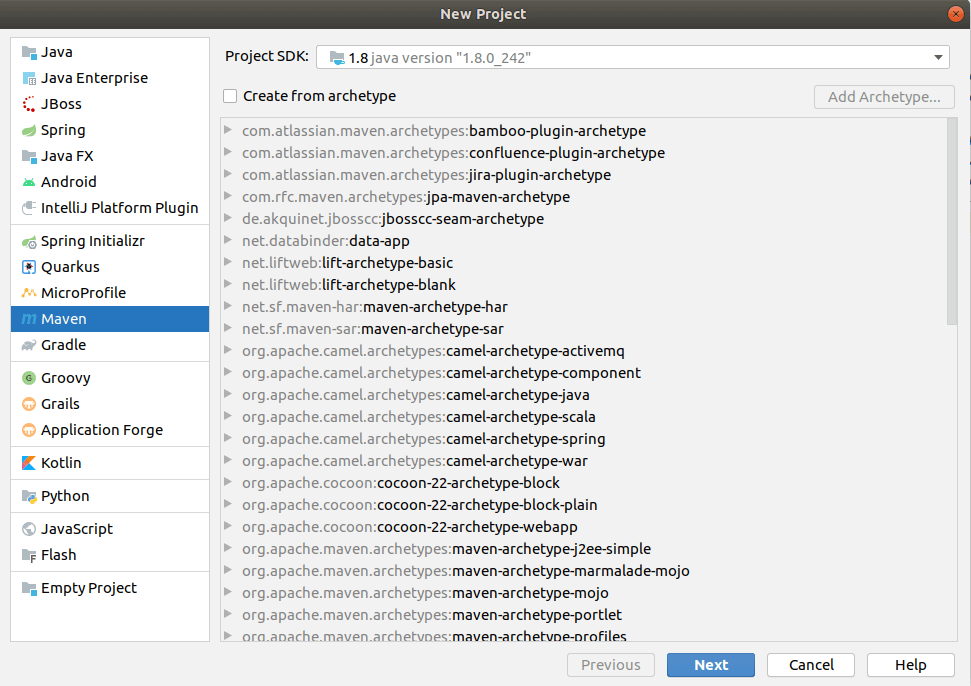
3.2. Create a new Maven Project
To create the first Spring Boot project we will use IntelliJ.
First, let's open the 'Create new Project' dialog, and choose Maven configuration:
In the next step, give a project name, fill artifactId and groupId:
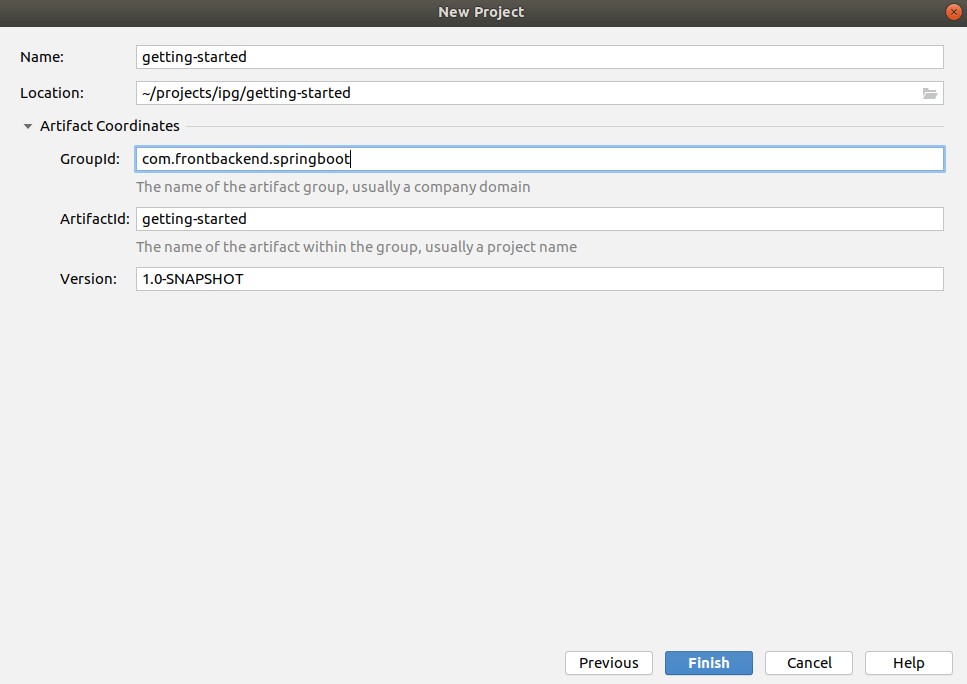
And click the 'Finish' button.
That will create an empty Maven project, to transform it into a Spring Boot project we need to:
- add related to Spring Boot dependencies in our
pom.xmlfile, - create the main Java class to start the Spring Boot application.
3.3. Import dependencies related to Spring Boot
Open pom.xml file and add the following content:
<?xml version="1.0" encoding="UTF-8"?>
<project xmlns="http://maven.apache.org/POM/4.0.0" xmlns:xsi="http://www.w3.org/2001/XMLSchema-instance"
         xsi:schemaLocation="http://maven.apache.org/POM/4.0.0 https://maven.apache.org/xsd/maven-4.0.0.xsd">
    <modelVersion>4.0.0</modelVersion>

    <!-- Inherit defaults from Spring Boot -->
    <parent>
        <groupId>org.springframework.boot</groupId>
        <artifactId>spring-boot-starter-parent</artifactId>
        <version>2.5.0</version>
        <relativePath/>
    </parent>

    <groupId>com.frontbackend.springboot</groupId>
    <artifactId>getting-started</artifactId>
    <version>0.0.1-SNAPSHOT</version>
    <name>getting-started</name>

    <properties>
        <java.version>1.8</java.version>
    </properties>

    <!-- Add typical dependencies for a web application -->
    <dependencies>
        <dependency>
            <groupId>org.springframework.boot</groupId>
            <artifactId>spring-boot-starter-web</artifactId>
        </dependency>
    </dependencies>

    <!-- Package as an executable jar -->
    <build>
        <plugins>
            <plugin>
                <groupId>org.springframework.boot</groupId>
                <artifactId>spring-boot-maven-plugin</artifactId>
            </plugin>
        </plugins>
    </build>

</project>
As you can see we are inherit default from Spring Boot parent:
<parent>
    <groupId>org.springframework.boot</groupId>
    <artifactId>spring-boot-starter-parent</artifactId>
    <version>2.5.0</version>
    <relativePath/>
</parent>
The spring-boot-starter-web dependency is used for web container, we will need that to provide simple REST API. By default Spring Boot is using embedded Tomcat, but it could be changed in pom.xml.
3.4. Write a main program to start the Spring Boot application
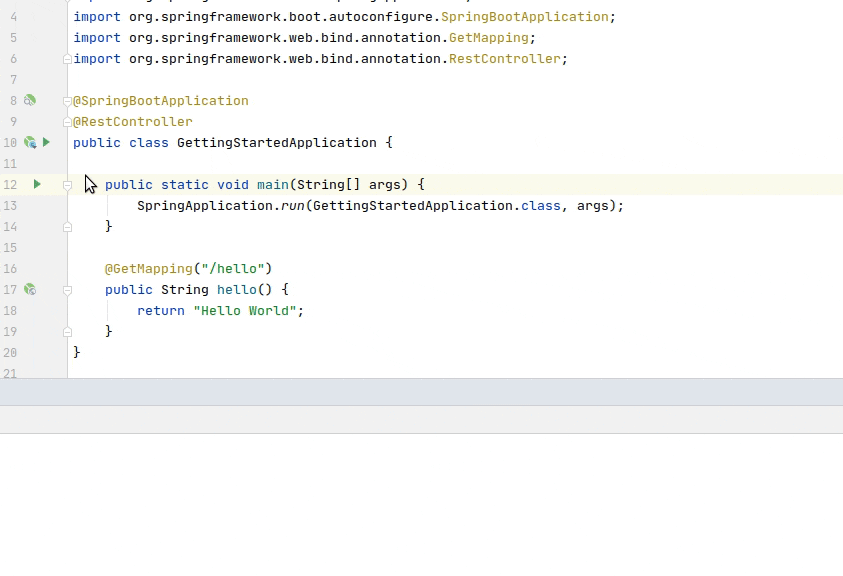
Next, create a package com.frontbackend.springboot and put a new class there GettingStartedApplication with the following content:
package com.frontbackend.springboot;

import org.springframework.boot.SpringApplication;
import org.springframework.boot.autoconfigure.SpringBootApplication;
import org.springframework.web.bind.annotation.GetMapping;
import org.springframework.web.bind.annotation.RestController;

@SpringBootApplication
@RestController
public class GettingStartedApplication {

    public static void main(String[] args) {
        SpringApplication.run(GettingStartedApplication.class, args);
    }

    @GetMapping("/hello")
    public String hello() {
        return "Hello World";
    }
}
We use @SpringBootApplication to mark the main class of a Spring Boot application. This annotation encapsulates three other:
- @Configuration - marks a class as a source of Spring beans,
- @ComponentsScan - tells Spring Boot to scan the current package (with all sub-packages) for components,
- @EnableAutoConfiguration - enables Spring Boot to auto-configure the application based on included jar files in the classpath.
The @RestController annotation is used to mark a class as a Rest controller that will be handing some requests via HTTP. We defined a single endpoint /hello that will be serving Hello World text.
The @RequestMapping annotation provides routing information. It tells Spring that any HTTP request with the /hello path should be mapped to the hello() method.
3.5. Start application
To start the Spring Boot application we use IntelliJ IDEA:
But you could also use a command such as:
> mvn spring-boot:run
or
> java -jar target/getting-started-0.0.1-SNAPSHOT.jar
If everything is correct and the default Spring Boot port 8080 is not occupied, there should be output on the console:
 /\\ / ___'_ __ _ _(_)_ __  __ _ \ \ \ \
( ( )\___ | '_ | '_| | '_ \/ _` | \ \ \ \
 \\/  ___)| |_)| | | | | || (_| |  ) ) ) )
  '  |____| .__|_| |_|_| |_\__, | / / / /
 =========|_|==============|___/=/_/_/_/
 :: Spring Boot ::                (v2.5.0)

2021-05-27 00:18:32.208  INFO 7743 --- [           main] c.f.s.GettingStartedApplication          : Starting GettingStartedApplication using Java 1.8.0_282 on user-inwebit with PID 7743 (/home/own/tutorials/spring-boot/getting-started/target/classes started by fromtbackend in /home/own/tutorials)
2021-05-27 00:18:32.210  INFO 7743 --- [           main] c.f.s.GettingStartedApplication          : No active profile set, falling back to default profiles: default
2021-05-27 00:18:33.122  INFO 7743 --- [           main] o.s.b.w.embedded.tomcat.TomcatWebServer  : Tomcat initialized with port(s): 8080 (http)
2021-05-27 00:18:33.129  INFO 7743 --- [           main] o.apache.catalina.core.StandardService   : Starting service [Tomcat]
2021-05-27 00:18:33.129  INFO 7743 --- [           main] org.apache.catalina.core.StandardEngine  : Starting Servlet engine: [Apache Tomcat/9.0.46]
2021-05-27 00:18:33.170  INFO 7743 --- [           main] o.a.c.c.C.[Tomcat].[localhost].[/]       : Initializing Spring embedded WebApplicationContext
2021-05-27 00:18:33.171  INFO 7743 --- [           main] w.s.c.ServletWebServerApplicationContext : Root WebApplicationContext: initialization completed in 917 ms
2021-05-27 00:18:33.498  INFO 7743 --- [           main] o.s.b.w.embedded.tomcat.TomcatWebServer  : Tomcat started on port(s): 8080 (http) with context path ''
2021-05-27 00:18:33.506  INFO 7743 --- [           main] c.f.s.GettingStartedApplication          : Started GettingStartedApplication in 1.61 seconds (JVM running for 1.974)
2021-05-27 00:18:33.507  INFO 7743 --- [           main] o.s.b.a.ApplicationAvailabilityBean      : Application availability state LivenessState changed to CORRECT
2021-05-27 00:18:33.508  INFO 7743 --- [           main] o.s.b.a.ApplicationAvailabilityBean      : Application availability state ReadinessState changed to ACCEPTING_TRAFFIC
In logs, we see that server starts in 1.61 seconds.
Now we can open the browser and enter http://localhost:8080/hello to check our endpoint.
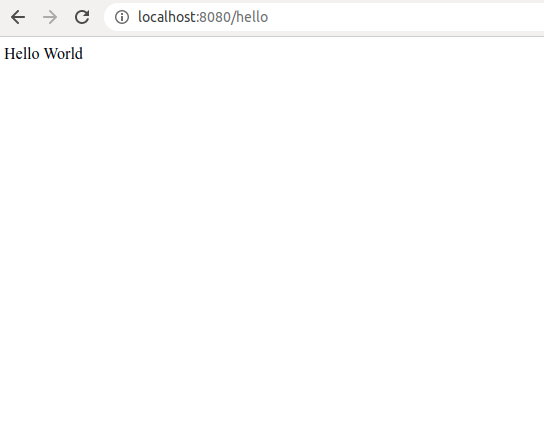
Everything works as excepted and we can see the Hello World text.
4. Conclusion
In this tutorial, we presented how to get started with the Spring Boot application. We showed a sample project that serves Hello World text on http://localhost:8080/hello endpoint.
As usual, the code used in this article could be found in our GitHub repository.
{{ 'Comments (%count%)' | trans {count:count} }}
{{ 'Comments are closed.' | trans }}