1. Introduction
In this tutorial, we are going to learn how to create Angular 11 application for uploading files to Spring Boot server with progress bar.
2. Architecture
The architecture contains two main layers:
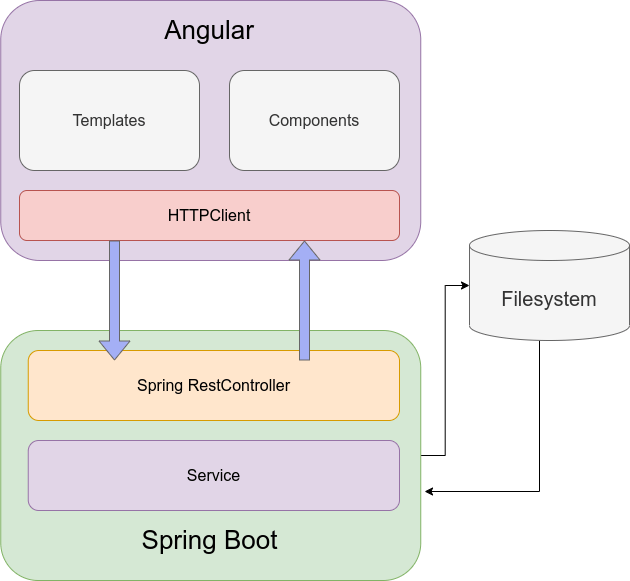
The Angular web application will be responsible for interactions with the end-user. The backend side will handle uploaded files and store them into the filesystem. The relation between the frontend and backend will be RESTful.
3. Spring Boot application
The Spring Boot application provides a single REST service that will handle multipart requests.
3.1. Project structure
The backend Maven project will have the following structure:
├── main
│   ├── java
│   │   └── com
│   │       └── frontbackend
│   │           └── springboot
│   │               ├── Application.java
│   │               ├── controller
│   │               │   └── FilesController.java
│   │               ├── exceptions
│   │               │   ├── FileUploadException.java
│   │               │   └── RestExceptionHandler.java
│   │               ├── model
│   │               │   └── UploadResponseMessage.java
│   │               └── service
│   │                   └── FileService.java
│   └── resources
│       └── application.properties
The application contains the following classes:
Application- Spring Boot application class that starts the server,FilesController- Spring controller used for handing HTTP requests,FileUploadException- File upload exception class,RestExceptionHandler- class mapping exceptions into HTTP responses,UploadResponseMessage- Java representation of JSON that provides information about uploading status,FileService- service that saves uploaded files in the filesystem,application.properties- Spring Boot application configuration file.
3.2. Maven configuration file
The backend project will be build using Maven.
The pom.xml file has the following structure:
<?xml version="1.0" encoding="UTF-8"?>
<project xmlns="http://maven.apache.org/POM/4.0.0" xmlns:xsi="http://www.w3.org/2001/XMLSchema-instance"
         xsi:schemaLocation="http://maven.apache.org/POM/4.0.0 https://maven.apache.org/xsd/maven-4.0.0.xsd">
    <modelVersion>4.0.0</modelVersion>

    <groupId>com.frontbackend.springboot</groupId>
    <artifactId>angular11-spring-boot2-upload-file-with-progress</artifactId>
    <version>0.0.1-SNAPSHOT</version>

    <!-- Inherit defaults from Spring Boot -->
    <parent>
        <groupId>org.springframework.boot</groupId>
        <artifactId>spring-boot-starter-parent</artifactId>
        <version>2.4.1</version>
    </parent>

    <!-- Add typical dependencies for a web application -->
    <dependencies>
        <dependency>
            <groupId>org.springframework.boot</groupId>
            <artifactId>spring-boot-starter-web</artifactId>
        </dependency>
    </dependencies>

    <!-- Package as an executable jar -->
    <build>
        <plugins>
            <plugin>
                <groupId>org.springframework.boot</groupId>
                <artifactId>spring-boot-maven-plugin</artifactId>
            </plugin>
        </plugins>
    </build>
</project>
3.2. Rest Controller
The FilesController class is responsible for handling uploaded files.
package com.frontbackend.springboot.controller;

import org.springframework.beans.factory.annotation.Autowired;
import org.springframework.http.HttpStatus;
import org.springframework.http.ResponseEntity;
import org.springframework.web.bind.annotation.PostMapping;
import org.springframework.web.bind.annotation.RequestMapping;
import org.springframework.web.bind.annotation.RequestParam;
import org.springframework.web.bind.annotation.RestController;
import org.springframework.web.multipart.MultipartFile;

import com.frontbackend.springboot.model.UploadResponseMessage;
import com.frontbackend.springboot.service.FileService;

@RestController
@RequestMapping("files")
public class FilesController {

    private final FileService fileService;

    @Autowired
    public FilesController(FileService fileService) {
        this.fileService = fileService;
    }

    @PostMapping
    public ResponseEntity<UploadResponseMessage> uploadFile(@RequestParam("file") MultipartFile file) {
        fileService.save(file);

        return ResponseEntity.status(HttpStatus.OK)
                             .body(new UploadResponseMessage("Uploaded the file successfully: " + file.getOriginalFilename()));
    }
}
The uploadFile(...) method is associated with a POST request to files endpoint. It uses the MultipartFile object that handles reference to the uploaded file in a temporary folder. This file will be removed at the end of the request processing.
3.3. Service class
The FileService was introduced to separate business logic from the REST controller. The service is checking if a file with the same uploaded name exists in the folder. If yes the exception is thrown:
package com.frontbackend.springboot.service;

import java.nio.file.Files;
import java.nio.file.Path;
import java.nio.file.Paths;

import org.springframework.beans.factory.annotation.Value;
import org.springframework.stereotype.Service;
import org.springframework.web.multipart.MultipartFile;

import com.frontbackend.springboot.exceptions.FileUploadException;

@Service
public class FileService {

    @Value("${upload.path}")
    private String uploadPath;

    public void save(MultipartFile file) throws FileUploadException {
        try {
            Path root = Paths.get(uploadPath);
            Path resolve = root.resolve(file.getOriginalFilename());
            if (resolve.toFile()
                       .exists()) {
                throw new FileUploadException("File already exists: " + file.getOriginalFilename());
            }
            Files.copy(file.getInputStream(), resolve);
        } catch (Exception e) {
            throw new FileUploadException("Could not store the file. Error: " + e.getMessage());
        }
    }
}
3.4. Spring Boot application class
In the Spring Boot application class we configured CORS and upload size limits:
package com.frontbackend.springboot;

import javax.servlet.MultipartConfigElement;

import org.springframework.boot.SpringApplication;
import org.springframework.boot.autoconfigure.SpringBootApplication;
import org.springframework.boot.web.servlet.MultipartConfigFactory;
import org.springframework.context.annotation.Bean;
import org.springframework.util.unit.DataSize;
import org.springframework.web.servlet.config.annotation.CorsRegistry;
import org.springframework.web.servlet.config.annotation.WebMvcConfigurer;

@SpringBootApplication
public class Application {

    public static void main(String[] args) {
        SpringApplication.run(Application.class, args);
    }

    @Bean
    MultipartConfigElement multipartConfigElement() {
        MultipartConfigFactory factory = new MultipartConfigFactory();
        factory.setMaxFileSize(DataSize.ofMegabytes(5));
        factory.setMaxRequestSize(DataSize.ofMegabytes(5));
        return factory.createMultipartConfig();
    }

    @Bean
    WebMvcConfigurer corsConfigurer() {
        return new WebMvcConfigurer() {
            @Override
            public void addCorsMappings(CorsRegistry registry) {
                registry.addMapping("/files")
                        .allowedOrigins("http://localhost:4200");
            }
        };
    }
}
3.5. Application configuration file
The application.properties contains the path for uploaded files:
upload.path=/path/to/upload/folder
4. Angular application
To generate the basic Angular project we will use Angular CLI:
The following command will create project angular in the current folder:
ng new angular
? Would you like to add Angular routing? No
? Which stylesheet format would you like to use? CSS
And, below commands used to create a service and component:
ng g s services/upload-file
ng g c components/upload-file
4.1. Web project structure
The Angular project contains the following files:
├── app
│   ├── app.component.html
│   ├── app.component.ts
│   ├── app.module.ts
│   ├── components
│   │   └── upload-file
│   │       ├── upload-file.component.html
│   │       └── upload-file.component.ts
│   └── services
│       └── upload-file.service.ts
├── assets
├── environments
│   ├── environment.prod.ts
│   └── environment.ts
├── favicon.ico
├── index.html
├── main.ts
├── polyfills.ts
└── styles.css
In frontend side we could distinguished:
app.module- for import necessary libraries and components,upload-file.service- using Angular HTTP Clienct to upload files to the backend,upload-files.component- the main website that contains upload form,app.component- main application component,index.html- index HTML website.
4.2. Upload file service
The UploadFileService will use the Angular HTTPClient library to send requests to the Spring Boot server:
import { Injectable } from '@angular/core';
import { HttpClient, HttpEvent, HttpRequest } from '@angular/common/http';
import { Observable } from 'rxjs';
import { environment } from '../../environments/environment';

@Injectable({
  providedIn: 'root'
})
export class UploadFileService {

  constructor(private http: HttpClient) {
  }

  upload(file: File): Observable<HttpEvent<any>> {
    const formData: FormData = new FormData();

    formData.append('file', file);

    const req = new HttpRequest('POST', `${environment.baseUrl}/files`, formData, {
      reportProgress: true,
      responseType: 'json'
    });

    return this.http.request(req);
  }
}
Note we set the reportProgress: true, flag to show the progress of every HTTP request call.
4.3. Environment variables
The angular.json file is a place for build instructions and configurations.
"production": {
              "fileReplacements": [
                {
                  "replace": "src/environments/environment.ts",
                  "with": "src/environments/environment.prod.ts"
                }
              ],
Every environment-specific file is represented by the fileReplacements section. If the production configuration is used Angular will replace src/environments/environment.ts with src/environments/environment.prod.ts, so the production settings will be used.
In our case the environment.prod.ts file looks like this:
export const environment = {
  production: true,
  baseUrl: 'https://production.url'
};
if we use ng build --configuration=production command to build the project, Angular CLI will perform the file replacement and src/environments/environment.ts is overwritten by src/environments/environment.prod.ts.
Without this special configuration attribute the regular file will be used environments/environment.ts that contains:
export const environment = {
  production: false,
  baseUrl: 'http://localhost:8080'
};
This environment file is imported in UploadFileService to get the baseUrl where we will be uploading files: ${environment.baseUrl}/files.
4.4. Upload file component
The UploadFileComponent will be responsible for interactions with user:
import { Component, OnInit } from '@angular/core';
import { UploadFileService } from '../../services/upload-file.service';
import { HttpEventType, HttpResponse } from '@angular/common/http';

@Component({
  selector: 'app-upload-file',
  templateUrl: './upload-file.component.html',
  styles: []
})
export class UploadFileComponent implements OnInit {

  selectedFiles?: FileList;
  currentFile?: File;
  progress = 0;
  message = '';
  errorMsg = '';

  constructor(private uploadService: UploadFileService) {
  }

  ngOnInit(): void {
  }

  selectFile(event: any): void {
    this.selectedFiles = event.target.files;
  }

  upload(): void {
    this.errorMsg = '';
    this.message = '';
    this.progress = 0;

    if (this.selectedFiles) {
      const file: File | null = this.selectedFiles.item(0);

      if (file) {
        this.currentFile = file;

        this.uploadService.upload(this.currentFile).subscribe(
          (event: any) => {
            if (event.type === HttpEventType.UploadProgress) {
              this.progress = Math.round(100 * event.loaded / event.total);

            } else if (event instanceof HttpResponse) {
              this.message = event.body.responseMessage;
            }
          },
          (err: any) => {
            console.log(err);

            if (err.error && err.error.responseMessage) {
              this.errorMsg = err.error.responseMessage;
            } else {
              this.errorMsg = 'Error occurred while uploading a file!';
            }

            this.currentFile = undefined;
          });
      }

      this.selectedFiles = undefined;
    }
  }
}
The selectFile is called then the user selects the file for upload.
selectFile(event: any): void {
    this.selectedFiles = event.target.files;
}
Clicking 'Upload file' will run the upload(): function that sends the file to the backend side.
The upload progress is holded in progress variable:
if (event.type === HttpEventType.UploadProgress) {
    this.progress = Math.round(100 * event.loaded / event.total);
}
The HTML component file contains:
inputwithtype="file"for select files for upload,button- upload file button,- Bootstrap progress bar for presenting upload progress status.
<div class="row">
    <div class="col-8">
        <label class="btn btn-default p-0">
            <input type="file" (change)="selectFile($event)"/>
        </label>
    </div>

    <div class="col-4 text-right">
        <button class="btn btn-success btn-sm" [disabled]="!selectedFiles" (click)="upload()">
            Upload file
        </button>
    </div>
</div>
<div class="row">
    <div class="col">
        <div *ngIf="currentFile" class="progress my-3">
            <div
                    class="progress-bar progress-bar-info progress-bar-striped"
                    role="progressbar"
                    attr.aria-valuenow="{{ progress }}"
                    aria-valuemin="0"
                    aria-valuemax="100"
                    [ngStyle]="{ width: progress + '%' }">
                {{ progress }}%
            </div>
        </div>

        <div *ngIf="message" class="alert alert-success" role="alert">{{ message }}</div>
        <div *ngIf="errorMsg" class="alert alert-danger" role="alert">{{ errorMsg }}</div>
    </div>
</div>
4.5. Application module
In Application module we import HTTP client:
import { BrowserModule } from '@angular/platform-browser';
import { NgModule } from '@angular/core';

import { AppComponent } from './app.component';
import { UploadFileComponent } from './components/upload-file/upload-file.component';
import { HttpClientModule } from '@angular/common/http';

@NgModule({
  declarations: [
    AppComponent,
    UploadFileComponent
  ],
  imports: [
    BrowserModule,
    HttpClientModule
  ],
  providers: [],
  bootstrap: [AppComponent]
})
export class AppModule { }
5. Demo
The application presents the following functionality:
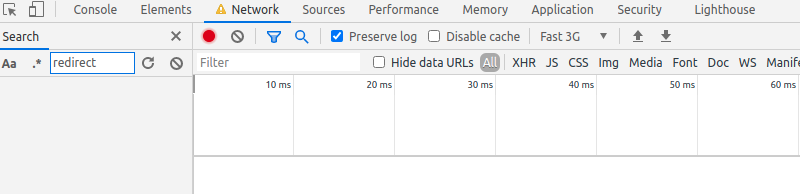
5.1. Slow down internet connection for local testing
Normally when testing locally, uploading will be very fast. You won't even notice changing progress bar. Fortunately, there is a way to slow down this process using Chrom Developer Tools.
- use the F12 key to open Developer Tools in Chrome browser,
- navigate to the
Networktab, - change the
Onlineoption toFast 3GorSlow 3G. - done, that's it.
6. Conclusion
In this tutorial, we presented how to build an Angular application for uploading a file with the progress bar.
As usual code used in this article is available in our GitHub repository.
{{ 'Comments (%count%)' | trans {count:count} }}
{{ 'Comments are closed.' | trans }}