1. Introduction
In this article, we will present how to create a Spring Boot application that uploads a file to the PostgreSQL database. The server application based on REST architecture will use Spring Data JPA for executing queries on the database and MultipartFile interface for handling multi-part requests.
2. Technology
Spring Boot application will use the following technology stack:
- Java 8
- Spring Boot 2
- Spring Data JPA
- PostgreSQL
- Maven 3.6.1
3. Project structure
├── pom.xml
├── src
│   ├── main
│   │   ├── java
│   │   │   └── com
│   │   │       └── frontbackend
│   │   │           └── springboot
│   │   │               ├── Application.java
│   │   │               ├── controller
│   │   │               │   └── FilesController.java
│   │   │               ├── exceptions
│   │   │               │   └── RestExceptionHandler.java
│   │   │               ├── model
│   │   │               │   ├── FileEntity.java
│   │   │               │   └── FileResponse.java
│   │   │               ├── repository
│   │   │               │   └── FileRepository.java
│   │   │               └── service
│   │   │                   └── FileService.java
│   │   └── resources
│   │       └── application.properties
Project contains:
FileEntityclass that is a data model entity object related to a table in the PostgreSQL database,FileResponseis a POJO object used to listing files,FileRepositoryis a Spring Data repository used to save and retrieve files to/from the database,FileServiceis our service that will be calling methods fromFileRepository,FilesControllerused to handle HTTP requests like POST (for uploading files), GET (for listing and downloading files),RestExceptionHandlerclass handles exceptions that could occur when processing requests,application.propertiesis a Spring Boot configuration file used to setup database connection and set file upload size limits,pom.xmlfor project dependencies.
4. REST API for uploading/downloading files
The Spring Boot application will provide a fully REST-ful API for:
- uploading files to PostgreSQL database,
- downloading files from the database,
- retrieving a list of uploaded files.
Spring Boot application will provide the following API endpoints:
| URL | Method | Action |
| /files | GET | Get list of uploaded files |
| /files | POST | Upload a single file |
| /files/{uuid} | GET | Download uploaded file |
Files will be downloaded directly to the database with informations like:
- name of the file,
- size of the file,
- generated UUID to identify the uploaded file,
- file content as BLOB,
- file content type.
5. Configure Spring Boot project
First, we need to create a Spring Boot project using initializer or with IDE like Eclipse, IntelliJ where we can simply create a new Maven project.
Then, we need to add Spring Boot web and Spring JPA starter dependencies to our pom.xml file:
<?xml version="1.0" encoding="UTF-8"?>
<project xmlns="http://maven.apache.org/POM/4.0.0" xmlns:xsi="http://www.w3.org/2001/XMLSchema-instance"
         xsi:schemaLocation="http://maven.apache.org/POM/4.0.0 https://maven.apache.org/xsd/maven-4.0.0.xsd">
    <modelVersion>4.0.0</modelVersion>

    <groupId>com.frontbackend.springboot</groupId>
    <artifactId>upload-file-to-postgresql</artifactId>
    <version>0.0.1-SNAPSHOT</version>

    <!-- Inherit defaults from Spring Boot -->
    <parent>
        <groupId>org.springframework.boot</groupId>
        <artifactId>spring-boot-starter-parent</artifactId>
        <version>2.1.5.RELEASE</version>
    </parent>

    <!-- Add typical dependencies for a web application -->
    <dependencies>
        <dependency>
            <groupId>org.springframework.boot</groupId>
            <artifactId>spring-boot-starter-web</artifactId>
        </dependency>
        <dependency>
            <groupId>org.springframework.boot</groupId>
            <artifactId>spring-boot-starter-data-jpa</artifactId>
        </dependency>
        <dependency>
            <groupId>org.postgresql</groupId>
            <artifactId>postgresql</artifactId>
            <version>42.2.11</version>
            <scope>runtime</scope>
        </dependency>
    </dependencies>

    <!-- Package as an executable jar -->
    <build>
        <plugins>
            <plugin>
                <groupId>org.springframework.boot</groupId>
                <artifactId>spring-boot-maven-plugin</artifactId>
            </plugin>
        </plugins>
    </build>

</project>
The org.postgresql:postgresql library is used for interactions with the PostgreSQL database.
For the latest versions of this dependecies check the following links:
6. Create Model Entity
Entity objects correspond to database tables. In our project we created a FileEntity class that will be related to the FILES table:
package com.frontbackend.springboot.model;

import javax.persistence.Entity;
import javax.persistence.GeneratedValue;
import javax.persistence.Id;
import javax.persistence.Lob;
import javax.persistence.Table;

import org.hibernate.annotations.GenericGenerator;

@Entity
@Table(name = "FILES")
public class FileEntity {

    @Id
    @GeneratedValue(generator = "uuid")
    @GenericGenerator(name = "uuid", strategy = "uuid2")
    private String id;

    private String name;

    private String contentType;

    private Long size;

    @Lob
    private byte[] data;

    public String getId() {
        return id;
    }

    public void setId(String id) {
        this.id = id;
    }

    public String getName() {
        return name;
    }

    public void setName(String name) {
        this.name = name;
    }

    public String getContentType() {
        return contentType;
    }

    public void setContentType(String contentType) {
        this.contentType = contentType;
    }

    public Long getSize() {
        return size;
    }

    public void setSize(Long size) {
        this.size = size;
    }

    public byte[] getData() {
        return data;
    }

    public void setData(byte[] data) {
        this.data = data;
    }
}
Two fields were marked with special annotations:
id-@Id,@GeneratedValue(generator = "uuid"),@GenericGenerator(name = "uuid", strategy = "uuid2")- this field will have auto-generated UUID,data-@Lobspecial datatype that informs about storing large objects in the database.
Second POJO class used in model layer is FileResponse:
package com.frontbackend.springboot.model;

public class FileResponse {

    private String id;
    private String name;
    private Long size;
    private String url;
    private String contentType;

    public String getId() {
        return id;
    }

    public void setId(String id) {
        this.id = id;
    }

    public String getName() {
        return name;
    }

    public void setName(String name) {
        this.name = name;
    }

    public Long getSize() {
        return size;
    }

    public void setSize(Long size) {
        this.size = size;
    }

    public String getUrl() {
        return url;
    }

    public void setUrl(String url) {
        this.url = url;
    }

    public String getContentType() {
        return contentType;
    }

    public void setContentType(String contentType) {
        this.contentType = contentType;
    }
}
This object will be used to present a list of files with detailed information about them, such as name, content type, size.
7. Implement data access layer
In our data access layer, we have an interface FileRepository that extends JpaRepository. Thanks to this, we have access to crud methods like save(...), getById(...), delete(...) etc.
package com.frontbackend.springboot.repository;

import org.springframework.data.jpa.repository.JpaRepository;
import org.springframework.stereotype.Repository;

import com.frontbackend.springboot.model.FileEntity;

@Repository
public interface FileRepository extends JpaRepository<FileEntity, String> {
}
8. Create service for managing files
The FileService class will be responsible for:
- saving uploaded files (transforming MultipartFile object into FileEntity),
- uploading a single file by provided id,
- return a list of uploaded files.
package com.frontbackend.springboot.service;

import java.io.IOException;
import java.util.List;
import java.util.Optional;

import org.springframework.beans.factory.annotation.Autowired;
import org.springframework.stereotype.Service;
import org.springframework.util.StringUtils;
import org.springframework.web.multipart.MultipartFile;

import com.frontbackend.springboot.model.FileEntity;
import com.frontbackend.springboot.repository.FileRepository;

@Service
public class FileService {

    private final FileRepository fileRepository;

    @Autowired
    public FileService(FileRepository fileRepository) {
        this.fileRepository = fileRepository;
    }

    public void save(MultipartFile file) throws IOException {
        FileEntity fileEntity = new FileEntity();
        fileEntity.setName(StringUtils.cleanPath(file.getOriginalFilename()));
        fileEntity.setContentType(file.getContentType());
        fileEntity.setData(file.getBytes());
        fileEntity.setSize(file.getSize());

        fileRepository.save(fileEntity);
    }

    public Optional<FileEntity> getFile(String id) {
        return fileRepository.findById(id);
    }

    public List<FileEntity> getAllFiles() {
        return fileRepository.findAll();
    }
}
In most cases FileService just calls methods from FileRepository but it is a good place for future business logic.
9. Create a REST controller for handing HTTP requests
The FilesController will be responsible for handling HTTP requests.
This class has been marked with the following annotations:
@RestController- annotation is used to treat this class as a REST controller,@RequestMapping- create a base endpoint to/filesURI.
Other annotations used in this class like @GetMapping, @PostMapping and @DeleteMapping - are for mapping HTTP GET, POST and DELETE requests with specific class methods:
| HTTP Method | Endpoint | Method |
| POST | /files | upload(...) |
| GET | /files | list(...) |
| GET | /files/{id} | getFile(...) |
package com.frontbackend.springboot.controller;

import java.util.List;
import java.util.Optional;
import java.util.stream.Collectors;

import org.springframework.beans.factory.annotation.Autowired;
import org.springframework.http.HttpHeaders;
import org.springframework.http.HttpStatus;
import org.springframework.http.MediaType;
import org.springframework.http.ResponseEntity;
import org.springframework.web.bind.annotation.GetMapping;
import org.springframework.web.bind.annotation.PathVariable;
import org.springframework.web.bind.annotation.PostMapping;
import org.springframework.web.bind.annotation.RequestMapping;
import org.springframework.web.bind.annotation.RequestParam;
import org.springframework.web.bind.annotation.RestController;
import org.springframework.web.multipart.MultipartFile;
import org.springframework.web.servlet.support.ServletUriComponentsBuilder;

import com.frontbackend.springboot.model.FileEntity;
import com.frontbackend.springboot.model.FileResponse;
import com.frontbackend.springboot.service.FileService;

@RestController
@RequestMapping("files")
public class FilesController {

    private final FileService fileService;

    @Autowired
    public FilesController(FileService fileService) {
        this.fileService = fileService;
    }

    @PostMapping
    public ResponseEntity<String> upload(@RequestParam("file") MultipartFile file) {
        try {
            fileService.save(file);

            return ResponseEntity.status(HttpStatus.OK)
                                 .body(String.format("File uploaded successfully: %s", file.getOriginalFilename()));
        } catch (Exception e) {
            return ResponseEntity.status(HttpStatus.INTERNAL_SERVER_ERROR)
                                 .body(String.format("Could not upload the file: %s!", file.getOriginalFilename()));
        }
    }

    @GetMapping
    public List<FileResponse> list() {
        return fileService.getAllFiles()
                          .stream()
                          .map(this::mapToFileResponse)
                          .collect(Collectors.toList());
    }

    private FileResponse mapToFileResponse(FileEntity fileEntity) {
        String downloadURL = ServletUriComponentsBuilder.fromCurrentContextPath()
                                                        .path("/files/")
                                                        .path(fileEntity.getId())
                                                        .toUriString();
        FileResponse fileResponse = new FileResponse();
        fileResponse.setId(fileEntity.getId());
        fileResponse.setName(fileEntity.getName());
        fileResponse.setContentType(fileEntity.getContentType());
        fileResponse.setSize(fileEntity.getSize());
        fileResponse.setUrl(downloadURL);

        return fileResponse;
    }

    @GetMapping("{id}")
    public ResponseEntity<byte[]> getFile(@PathVariable String id) {
        Optional<FileEntity> fileEntityOptional = fileService.getFile(id);

        if (!fileEntityOptional.isPresent()) {
            return ResponseEntity.notFound()
                                 .build();
        }

        FileEntity fileEntity = fileEntityOptional.get();
        return ResponseEntity.ok()
                             .header(HttpHeaders.CONTENT_DISPOSITION, "attachment; filename=\"" + fileEntity.getName() + "\"")
                             .contentType(MediaType.valueOf(fileEntity.getContentType()))
                             .body(fileEntity.getData());
    }
}
10. Configure JPA, Hibernate and file size upload limits
In the application.properties file we created a several entries:
spring.datasource.url=jdbc:postgresql://localhost:5432/testdb
spring.datasource.username=username
spring.datasource.password=password

spring.jpa.properties.hibernate.jdbc.lob.non_contextual_creation=true
spring.jpa.properties.hibernate.dialect=org.hibernate.dialect.PostgreSQLDialect

spring.jpa.hibernate.ddl-auto=create

spring.servlet.multipart.max-file-size=1MB
spring.servlet.multipart.max-request-size=1MB
We used the following properties:
spring.datasource.url- to define a datasource,spring.datasource.username- database username,spring.datasource.password- database password,spring.jpa.hibernate.ddl-autocan be:none- no change is made to the database structure,update- Hibernate will change the database according to the given entity structures,create- this will creates the database every time on server start,create-drop- creates the database and drops it when SessionFactory closes.
spring.servlet.multipart.max-file-size- maximum file size for each request.spring.servlet.multipart.max-request-size- maximum size for a multipart requests.
11. Create exception handler
The class annotated with @ControllerAdvice is responsible for handling exceptions that may occur during the uploading files process:
package com.frontbackend.springboot.exceptions;

import org.springframework.http.HttpStatus;
import org.springframework.http.ResponseEntity;
import org.springframework.web.bind.annotation.ControllerAdvice;
import org.springframework.web.bind.annotation.ExceptionHandler;
import org.springframework.web.multipart.MaxUploadSizeExceededException;
import org.springframework.web.servlet.mvc.method.annotation.ResponseEntityExceptionHandler;

@ControllerAdvice
public class RestExceptionHandler extends ResponseEntityExceptionHandler {

    @ExceptionHandler(MaxUploadSizeExceededException.class)
    public ResponseEntity<String> handleMaxSizeException(MaxUploadSizeExceededException exc) {
        return ResponseEntity.status(HttpStatus.BAD_REQUEST)
                             .body("Unable to upload. File is too large!");
    }
}
We handle just MaxUploadSizeExceededException but this could be extended to some other exceptions as well.
12. Main Spring Boot starting server class
The main Spring Boot application class that starts the server has the following structure:
package com.frontbackend.springboot;

import org.springframework.boot.SpringApplication;
import org.springframework.boot.autoconfigure.SpringBootApplication;
import org.springframework.web.bind.annotation.RestController;

@SpringBootApplication
@RestController
public class Application {

    public static void main(String[] args) {
        SpringApplication.run(Application.class, args);
    }
}
13. Testing Application API
To run the Spring Boot server use mvn spring-boot:run command or find the generated jar in the /target folder and type java -jar upload-file-to-postgresql-0.0.1-SNAPSHOT.jar.
When everything is correctly configured You should see information about the started server:
INFO 27542 --- [ main] com.frontbackend.springboot.Application : Started Application in 2.929 seconds (JVM running for 3.312)
Also in the database, there should be a new table called FILES with the following structure:

We will use Postman to make some API requests.
13.1. First, let's upload some file
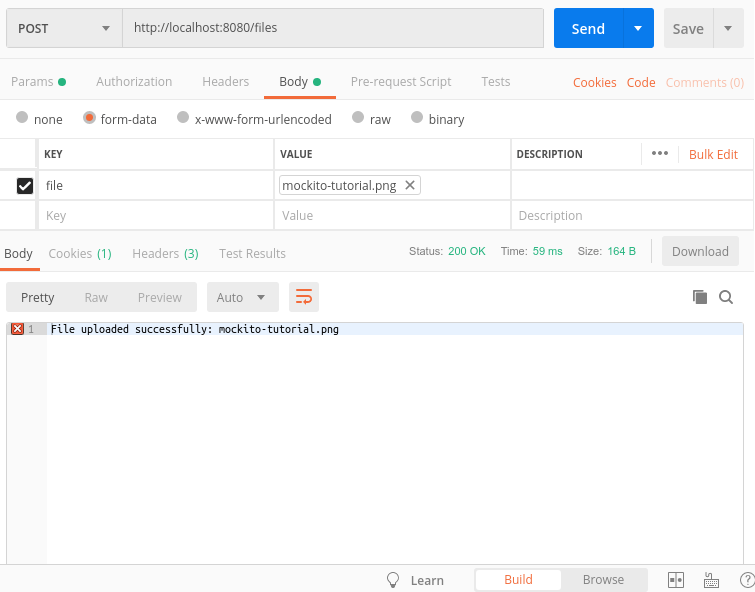
In the FILES table a new record appeared:

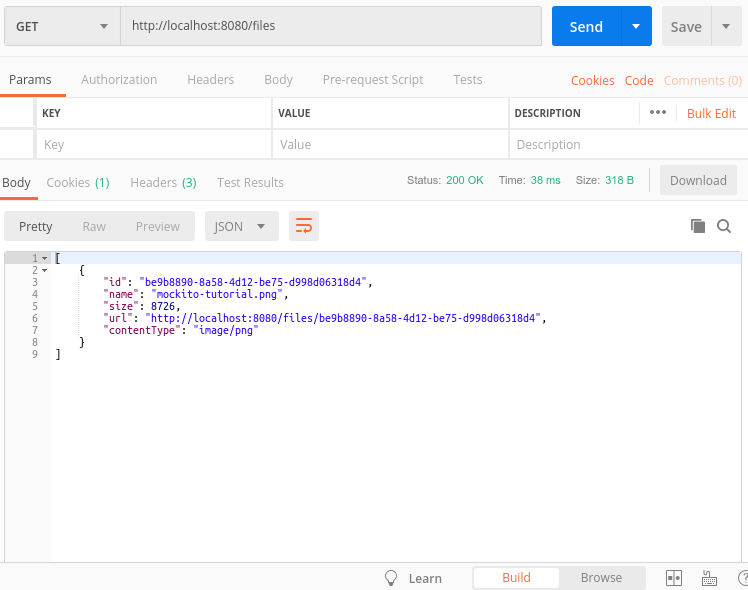
13.2. Now check a list of uploaded files
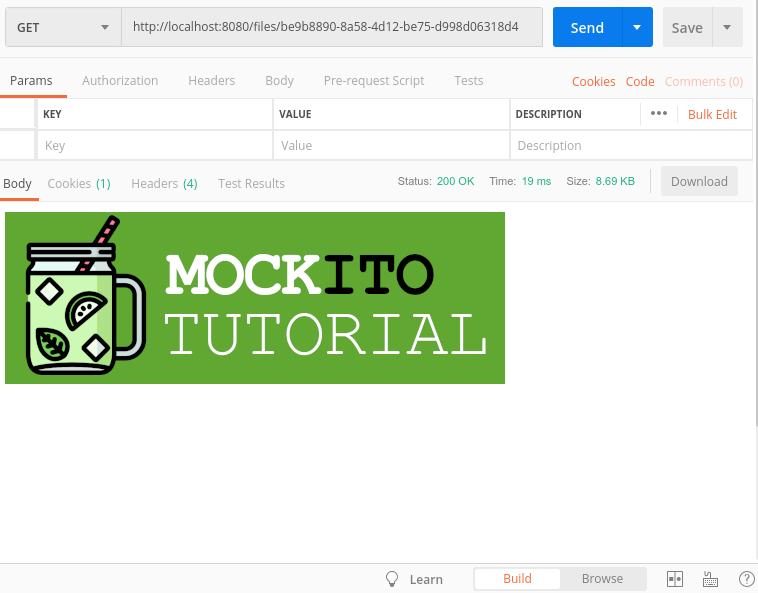
13.3. Finally, download the upload file using a provided URL
14. Conclusion
In this tutorial, we presented step by step how to create a Spring Boot application that will upload files to the PostgreSQL database.
As usual, the code used in this tutorial is available in our GitHub repository.
{{ 'Comments (%count%)' | trans {count:count} }}
{{ 'Comments are closed.' | trans }}