1. Introduction
In this article, we will present how to create a Spring Boot application for uploading files to the Redis database. Redis is an in-memory data structure store, used as a database, cache, and message broker. Usually, this type of database is used for other purposes but, there are no contraindications for keeping files in it also.
2. Architecture
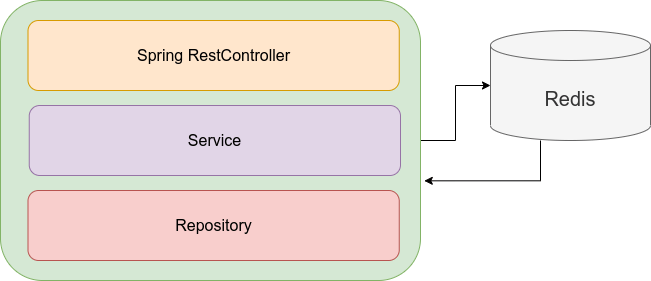
In the architecture of the application we could distinguish:
- persistence layer (Redis),
- Spring Boot with REST Controller, Service, and Repository that communicates with Redis.
3. Technology
Spring Boot application will use the following technologies:
- Java 8
- Spring Boot 2
- Redis
- Maven 3.6.1
4. Project structure
├── pom.xml
├── src
│   ├── main
│   │   ├── java
│   │   │   └── com
│   │   │       └── frontbackend
│   │   │           └── springboot
│   │   │               ├── Application.java
│   │   │               ├── config
│   │   │               │   └── RedisConfiguration.java
│   │   │               ├── controller
│   │   │               │   └── FilesController.java
│   │   │               ├── model
│   │   │               │   └── FileEntity.java
│   │   │               ├── repository
│   │   │               │   └── FileRepository.java
│   │   │               └── service
│   │   │                   └── FileService.java
│   │   └── resources
│   │       └── application.properties
To upload files to Redis we need:
FileEntityclass contains fields with information about a file,FileRepositoryis a Spring Data repository used to save and retrieve files to/from the Redis,FileServiceclass that calls methods fromFileRepository,FilesControllerused to handle HTTP requests like POST (for uploading files), GET (downloading files),application.propertiesis a Spring Boot configuration file used to setup Redis and set file upload size limits,pom.xmlfor Maven dependencies.
5. REST API for uploading/downloading files
The Spring Boot application will provide a REST API for:
- uploading files to Redis,
- downloading files from the database.
| URL | Method | Action |
| /files | POST | Upload a single file |
| /files/{uuid} | GET | Download uploaded file |
Files will be uploaded directly to the Redis with informations like:
- generated UUID to identify the uploaded file,
- name of the file,
- size of the file,
- file content as BLOB,
- file content type.
6. Configure Spring Boot project
Let's start with creating new Spring Boot project using initializer or with IDE like Eclipse, IntelliJ.
Next, we need to add Spring and Redis related dependencies to pom.xml file:
<?xml version="1.0" encoding="UTF-8"?>
<project xmlns="http://maven.apache.org/POM/4.0.0" xmlns:xsi="http://www.w3.org/2001/XMLSchema-instance"
         xsi:schemaLocation="http://maven.apache.org/POM/4.0.0 https://maven.apache.org/xsd/maven-4.0.0.xsd">
    <modelVersion>4.0.0</modelVersion>

    <groupId>com.frontbackend.springboot</groupId>
    <artifactId>upload-file-to-redis</artifactId>
    <version>0.0.1-SNAPSHOT</version>

    <!-- Inherit defaults from Spring Boot -->
    <parent>
        <groupId>org.springframework.boot</groupId>
        <artifactId>spring-boot-starter-parent</artifactId>
        <version>2.4.4-SNAPSHOT</version>
    </parent>

    <!-- Add typical dependencies for a web application -->
    <dependencies>
        <dependency>
            <groupId>org.springframework.boot</groupId>
            <artifactId>spring-boot-starter-web</artifactId>
        </dependency>
        <dependency>
            <groupId>org.springframework.data</groupId>
            <artifactId>spring-data-redis</artifactId>
        </dependency>
        <dependency>
            <groupId>redis.clients</groupId>
            <artifactId>jedis</artifactId>
            <version>3.3.0</version>
        </dependency>
    </dependencies>

    <!-- Package as an executable jar -->
    <build>
        <plugins>
            <plugin>
                <groupId>org.springframework.boot</groupId>
                <artifactId>spring-boot-maven-plugin</artifactId>
            </plugin>
        </plugins>
    </build>

</project>
The Jedis is a lightweight library used for communication with Redis.
For the latest versions of all dependencies used in our project could be found below:
7. File Entity
The FileEntity class is annotated with @RedisHash that marks Objects as aggregate roots to be stored in a Redis database.
The entity object that will be saved in Redis has the following structure:
package com.frontbackend.springboot.model;

import org.springframework.data.redis.core.RedisHash;

@RedisHash("File")
public class FileEntity {

    private String id;
    private String name;
    private String contentType;
    private Long size;
    private byte[] data;

    public String getId() {
        return id;
    }

    public void setId(String id) {
        this.id = id;
    }

    public String getName() {
        return name;
    }

    public void setName(String name) {
        this.name = name;
    }

    public String getContentType() {
        return contentType;
    }

    public void setContentType(String contentType) {
        this.contentType = contentType;
    }

    public Long getSize() {
        return size;
    }

    public void setSize(Long size) {
        this.size = size;
    }

    public byte[] getData() {
        return data;
    }

    public void setData(byte[] data) {
        this.data = data;
    }
}
8. Data access layer
In the DAO layer, we have an interface FileRepository that extends org.springframework.data.repository.CrudRepository class to activate CRUD operations.
package com.frontbackend.springboot.repository;

import org.springframework.data.repository.CrudRepository;
import org.springframework.stereotype.Repository;

import com.frontbackend.springboot.model.FileEntity;

@Repository
public interface FileRepository extends CrudRepository<FileEntity, String> {
}
9. Create a service for managing files
The FileService class was introduced to separate logic related to files from the REST controller.
package com.frontbackend.springboot.service;

import java.io.IOException;
import java.util.Optional;
import java.util.UUID;

import org.springframework.beans.factory.annotation.Autowired;
import org.springframework.stereotype.Service;
import org.springframework.util.StringUtils;
import org.springframework.web.multipart.MultipartFile;

import com.frontbackend.springboot.model.FileEntity;
import com.frontbackend.springboot.repository.FileRepository;

@Service
public class FileService {

    private final FileRepository fileRepository;

    @Autowired
    public FileService(FileRepository fileRepository) {
        this.fileRepository = fileRepository;
    }

    public FileEntity save(MultipartFile file) throws IOException {
        FileEntity fileEntity = new FileEntity();
        fileEntity.setId(UUID.randomUUID().toString());
        fileEntity.setName(StringUtils.cleanPath(file.getOriginalFilename()));
        fileEntity.setContentType(file.getContentType());
        fileEntity.setData(file.getBytes());
        fileEntity.setSize(file.getSize());

        return fileRepository.save(fileEntity);
    }

    public Optional<FileEntity> getFile(String id) {
        return fileRepository.findById(id);
    }
}
The structure of FileService is simple. For now, it uses for calling methods from FileRepository.
10. REST controller for handing HTTP requests
The FilesController will be responsible for handling HTTP requests.
This class has been marked with the following annotations:
@RestController- annotation is used to treat this class as a REST controller,@RequestMapping- create a base endpoint to/filesURI.
Other annotations used in this class like @GetMapping, @PostMapping for mapping HTTP GET, POST requests with specific class methods:
| HTTP Method | Endpoint | Method |
| POST | /files | upload(...) |
| GET | /files/{id} | getFile(...) |
package com.frontbackend.springboot.controller;

import java.util.Optional;

import org.springframework.beans.factory.annotation.Autowired;
import org.springframework.http.HttpHeaders;
import org.springframework.http.HttpStatus;
import org.springframework.http.MediaType;
import org.springframework.http.ResponseEntity;
import org.springframework.web.bind.annotation.GetMapping;
import org.springframework.web.bind.annotation.PathVariable;
import org.springframework.web.bind.annotation.PostMapping;
import org.springframework.web.bind.annotation.RequestMapping;
import org.springframework.web.bind.annotation.RequestParam;
import org.springframework.web.bind.annotation.RestController;
import org.springframework.web.multipart.MultipartFile;

import com.frontbackend.springboot.model.FileEntity;
import com.frontbackend.springboot.service.FileService;

@RestController
@RequestMapping("files")
public class FilesController {

    private final FileService fileService;

    @Autowired
    public FilesController(FileService fileService) {
        this.fileService = fileService;
    }

    @PostMapping
    public ResponseEntity<String> upload(@RequestParam("file") MultipartFile file) {
        try {
            FileEntity fileEntity = fileService.save(file);

            return ResponseEntity.status(HttpStatus.OK)
                                 .body(String.format("File uploaded successfully: %s, uuid=%s", file.getOriginalFilename(), fileEntity.getId()));
        } catch (Exception e) {
            e.printStackTrace();
            return ResponseEntity.status(HttpStatus.INTERNAL_SERVER_ERROR)
                                 .body(String.format("Could not upload the file: %s!", file.getOriginalFilename()));
        }
    }

    @GetMapping("{id}")
    public ResponseEntity<byte[]> getFile(@PathVariable String id) {
        Optional<FileEntity> fileEntityOptional = fileService.getFile(id);

        if (!fileEntityOptional.isPresent()) {
            return ResponseEntity.notFound()
                                 .build();
        }

        FileEntity fileEntity = fileEntityOptional.get();
        return ResponseEntity.ok()
                             .header(HttpHeaders.CONTENT_DISPOSITION, "attachment; filename=\"" + fileEntity.getName() + "\"")
                             .contentType(MediaType.valueOf(fileEntity.getContentType()))
                             .body(fileEntity.getData());
    }
}
11. Configuration file
In the application.properties file we created several properties:
redis.host=localhost
redis.port=6379
redis.password=1hAe8EDX6gBG0pC8daeW
redis.database=0

spring.servlet.multipart.max-file-size=1MB
spring.servlet.multipart.max-request-size=1MB
We used the following properties:
redis.host- host of Redis,redis.port- port on which Redis is available,redis.password- our Redis instance is secured with password, thats why we need for connection with the database,redis.database- the index of Redis database,spring.servlet.multipart.max-file-size- maximum file size for each request.spring.servlet.multipart.max-request-size- maximum size for a multipart requests.
12. Configuration class
To connect with Redis we need to define a JedisConnectionFactory and a RedisTemplate beans.
package com.frontbackend.springboot.config;

import java.time.Duration;

import org.springframework.beans.factory.annotation.Value;
import org.springframework.context.annotation.Bean;
import org.springframework.context.annotation.Configuration;
import org.springframework.data.redis.connection.RedisPassword;
import org.springframework.data.redis.connection.RedisStandaloneConfiguration;
import org.springframework.data.redis.connection.jedis.JedisClientConfiguration;
import org.springframework.data.redis.connection.jedis.JedisConnectionFactory;
import org.springframework.data.redis.core.RedisTemplate;

@Configuration
public class RedisConfiguration {

    @Value("${redis.host}")
    private String host;

    @Value("${redis.port}")
    private int port;

    @Value("${redis.database}")
    private int database;

    @Value("${redis.password}")
    private String password;

    @Bean
    JedisConnectionFactory jedisConnectionFactory() {
        RedisStandaloneConfiguration redisStandaloneConfiguration = new RedisStandaloneConfiguration();
        redisStandaloneConfiguration.setHostName(host);
        redisStandaloneConfiguration.setPort(port);
        redisStandaloneConfiguration.setDatabase(database);
        redisStandaloneConfiguration.setPassword(RedisPassword.of(password));

        JedisClientConfiguration.JedisClientConfigurationBuilder jedisClientConfiguration = JedisClientConfiguration.builder();
        jedisClientConfiguration.connectTimeout(Duration.ofSeconds(60));// 60s connection timeout

        return new JedisConnectionFactory(redisStandaloneConfiguration, jedisClientConfiguration.build());
    }

    @Bean
    public RedisTemplate<String, Object> redisTemplate() {
        RedisTemplate<String, Object> template = new RedisTemplate<>();
        template.setConnectionFactory(jedisConnectionFactory());
        return template;
    }
}
13. Main Spring Boot starting server class
The main Spring Boot application class that starts the server has the following structure:
package com.frontbackend.springboot;

import org.springframework.boot.SpringApplication;
import org.springframework.boot.autoconfigure.SpringBootApplication;
import org.springframework.web.bind.annotation.RestController;

@SpringBootApplication
@RestController
public class Application {

    public static void main(String[] args) {
        SpringApplication.run(Application.class, args);
    }
}
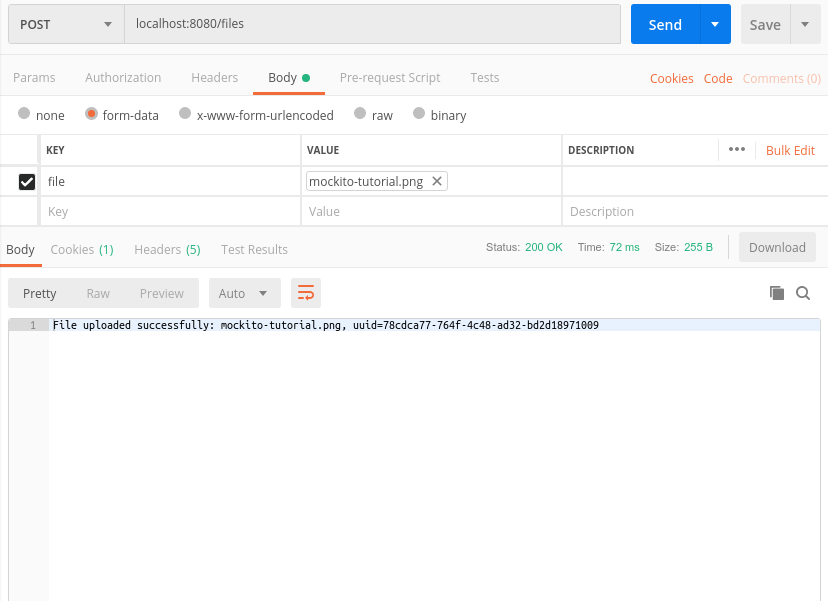
14. Testing Application API
To run the Spring Boot server use mvn spring-boot:run command or find the generated jar in the /target folder and type java -jar upload-file-to-redis-0.0.1-SNAPSHOT.jar.
We will use Postman to make some API requests.
14.1. First, let's upload some file
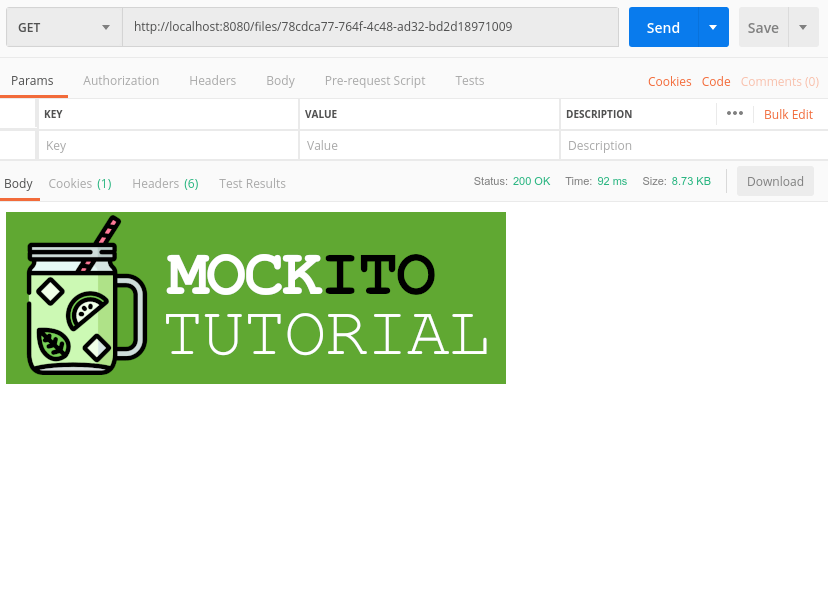
14.2. Next, let's download the uploaded file using a provided URL
15. Conclusion
In this tutorial, we presented how to create a Spring Boot application that will upload files to the Redis memory database.
As usual, the code used in this tutorial is available in our GitHub repository.
{{ 'Comments (%count%)' | trans {count:count} }}
{{ 'Comments are closed.' | trans }}