1. Introduction
In this article, we are going to present a way to build the Thymeleaf Drop File Area using Thymeleaf form and Dropzonejs library. Uploading files with drag and drop feature is a super user-friendly solution widely used on websites where the emphasis on usability is very high.
If you just starting with Thymeleaf, got and check below links :
Thymeleaf configuration with Spring Boot
Working with Forms in Thymeleaf
2. Dependencies
2.1. Maven dependencies
The sample application use three main Maven dependencies:
- org.springframework.boot:spring-boot-starter-web:2.1.5.RELEASE - common Spring Boot dependency,
- org.springframework.boot:spring-boot-starter-thymeleaf:2.1.5.RELEASE - Thymeleaf template engine dependency,
- org.projectlombok:lombok:1.18.2 - library that generates Setters, Getters and Constructors for POJO classes,
- org.webjars:bootstrap:4.0.0-2 - webjar with Bootstrap framework.
2.2. Front-End libraries
- bootstrap - frontend framework for creating responsive websites,
- dropzonejs - JavaScript library for building uploading file areas.
Maven pom.xml file have the following structure:
<?xml version="1.0" encoding="UTF-8"?>
<project xmlns="http://maven.apache.org/POM/4.0.0"
         xmlns:xsi="http://www.w3.org/2001/XMLSchema-instance"
         xsi:schemaLocation="http://maven.apache.org/POM/4.0.0 http://maven.apache.org/xsd/maven-4.0.0.xsd">
    <modelVersion>4.0.0</modelVersion>

    <artifactId>thymeleaf-bootstrap-dropzone</artifactId>

    <properties>
        <bootstrap.version>4.0.0-2</bootstrap.version>
        <webjars-locator.version>0.30</webjars-locator.version>
        <lombok.version>1.18.2</lombok.version>
    </properties>

    <!-- Inherit defaults from Spring Boot -->
    <parent>
        <groupId>org.springframework.boot</groupId>
        <artifactId>spring-boot-starter-parent</artifactId>
        <version>2.1.5.RELEASE</version>
    </parent>

    <!-- Add typical dependencies for a web application -->
    <dependencies>
        <dependency>
            <groupId>org.springframework.boot</groupId>
            <artifactId>spring-boot-starter-web</artifactId>
        </dependency>

        <dependency>
            <groupId>org.springframework.boot</groupId>
            <artifactId>spring-boot-starter-thymeleaf</artifactId>
        </dependency>

        <dependency>
            <groupId>org.webjars</groupId>
            <artifactId>bootstrap</artifactId>
            <version>${bootstrap.version}</version>
        </dependency>

        <dependency>
            <groupId>org.webjars</groupId>
            <artifactId>webjars-locator</artifactId>
            <version>${webjars-locator.version}</version>
        </dependency>

        <dependency>
            <groupId>org.projectlombok</groupId>
            <artifactId>lombok</artifactId>
            <version>${lombok.version}</version>
            <scope>provided</scope>
        </dependency>
    </dependencies>

    <!-- Package as an executable jar -->
    <build>
        <plugins>
            <plugin>
                <groupId>org.springframework.boot</groupId>
                <artifactId>spring-boot-maven-plugin</artifactId>
            </plugin>
        </plugins>
    </build>

</project>
3. Web/Rest Controller and Main Application class
Web controller class was created to handle GET requests on the root path and return rendered main page:
package com.frontbackend.thymeleaf.bootstrap.controller;

import org.springframework.stereotype.Controller;
import org.springframework.web.bind.annotation.GetMapping;
import org.springframework.web.bind.annotation.RequestMapping;

@Controller
@RequestMapping("/")
public class IndexController {

    @GetMapping
    public String main() {
        return "index";
    }
}
The FileUploadController is our REST controller responsibe for processing uploaded files. In our case it simply prints original name of the uploaded file:
package com.frontbackend.thymeleaf.bootstrap.controller;

import org.springframework.web.bind.annotation.PostMapping;
import org.springframework.web.bind.annotation.RequestMapping;
import org.springframework.web.bind.annotation.RequestParam;
import org.springframework.web.bind.annotation.RestController;
import org.springframework.web.multipart.MultipartFile;

import lombok.extern.slf4j.Slf4j;

@Slf4j
@RestController
@RequestMapping("/upload")
public class FileUploadController {

    @PostMapping
    public void upload(@RequestParam("file") MultipartFile file) {
        log.info("uploaded file " + file.getOriginalFilename());
    }
}
The Application class is annotated with @SpringBootApplication to become the common class that starts the Spring Boot application server:
package com.frontbackend.thymeleaf.bootstrap;

import org.springframework.boot.SpringApplication;
import org.springframework.boot.autoconfigure.SpringBootApplication;

@SpringBootApplication
public class Application {

    public static void main(String[] args) {
        SpringApplication.run(Application.class, args);
    }
}
Additionally we added parameters in application.properties to limit the size of files that can be uploaded:
spring.servlet.multipart.max-file-size=5MB
spring.servlet.multipart.max-request-size=5MB
4. Templates
The presentation layer contains one single view - index.html that has the following structure:
<!DOCTYPE HTML>
<html lang="en" xmlns:th="http://www.thymeleaf.org">
<head>
    <meta charset="UTF-8"/>
    <title>Spring Boot Thymeleaf Application - Bootstrap Dropzone</title>

    <link th:rel="stylesheet" th:href="@{/webjars/bootstrap/4.0.0-2/css/bootstrap.min.css} "/>
    <link th:rel="stylesheet" th:href="@{/assets/dropzonejs/dropzone.css}"/>
    <link th:rel="stylesheet" th:href="@{/assets/toastr/toastr.min.css}"/>
</head>
<body>

<!-- Navigation -->
<nav class="navbar navbar-expand-lg navbar-dark bg-dark static-top">
    <div class="container">
        <a class="navbar-brand" href="/">Thymeleaf - Bootstrap Dropzone</a>
        <button class="navbar-toggler" type="button" data-toggle="collapse" data-target="#navbarResponsive"
                aria-controls="navbarResponsive"
                aria-expanded="false" aria-label="Toggle navigation">
            <span class="navbar-toggler-icon"></span>
        </button>
        <div class="collapse navbar-collapse" id="navbarResponsive">
            <ul class="navbar-nav ml-auto">
                <li class="nav-item active">
                    <a class="nav-link" href="#">Home
                        <span class="sr-only">(current)</span>
                    </a>
                </li>
                <li class="nav-item">
                    <a class="nav-link" href="#">About</a>
                </li>
                <li class="nav-item">
                    <a class="nav-link" href="#">Services</a>
                </li>
                <li class="nav-item">
                    <a class="nav-link" href="#">Contact</a>
                </li>
            </ul>
        </div>
    </div>
</nav>

<div class="container">
    <div class="row">
        <div class="col-lg-8 mt-5">

            <div th:if="${message}">
                <h2 th:text="${message}"/>
            </div>

            <div id="dropzone">
                <form action="/upload" class="dropzone needsclick" id="demo-upload">

                    <div class="dz-message needsclick">
                        <button type="button" class="dz-button">Drop files here or click to upload.</button>
                        <br/>
                    </div>

                </form>
            </div>

        </div>
    </div>

</div>


<script th:src="@{/webjars/jquery/jquery.min.js}"></script>
<script th:src="@{/webjars/popper.js/umd/popper.min.js}"></script>
<script th:src="@{/webjars/bootstrap/js/bootstrap.min.js}"></script>
<script th:src="@{/assets/dropzonejs/dropzone.min.js}"></script>
<script th:src="@{/assets/toastr/toastr.min.js}"></script>

<script>
    Dropzone.autoDiscover = false;

    $("#demo-upload").dropzone({
        success : function(file, response) {
            toastr.success('File ' + file.name + ' uploaded successfully');
        }
    });
</script>

</body>
</html>
To create drop file area we used external JavaScript library - https://www.dropzonejs.com. The component is initialized in a simple JS script:
$("#demo-upload").dropzone({
        success : function(file, response) {
            toastr.success('File ' + file.name + ' uploaded successfully');
        }
    });
5. The output
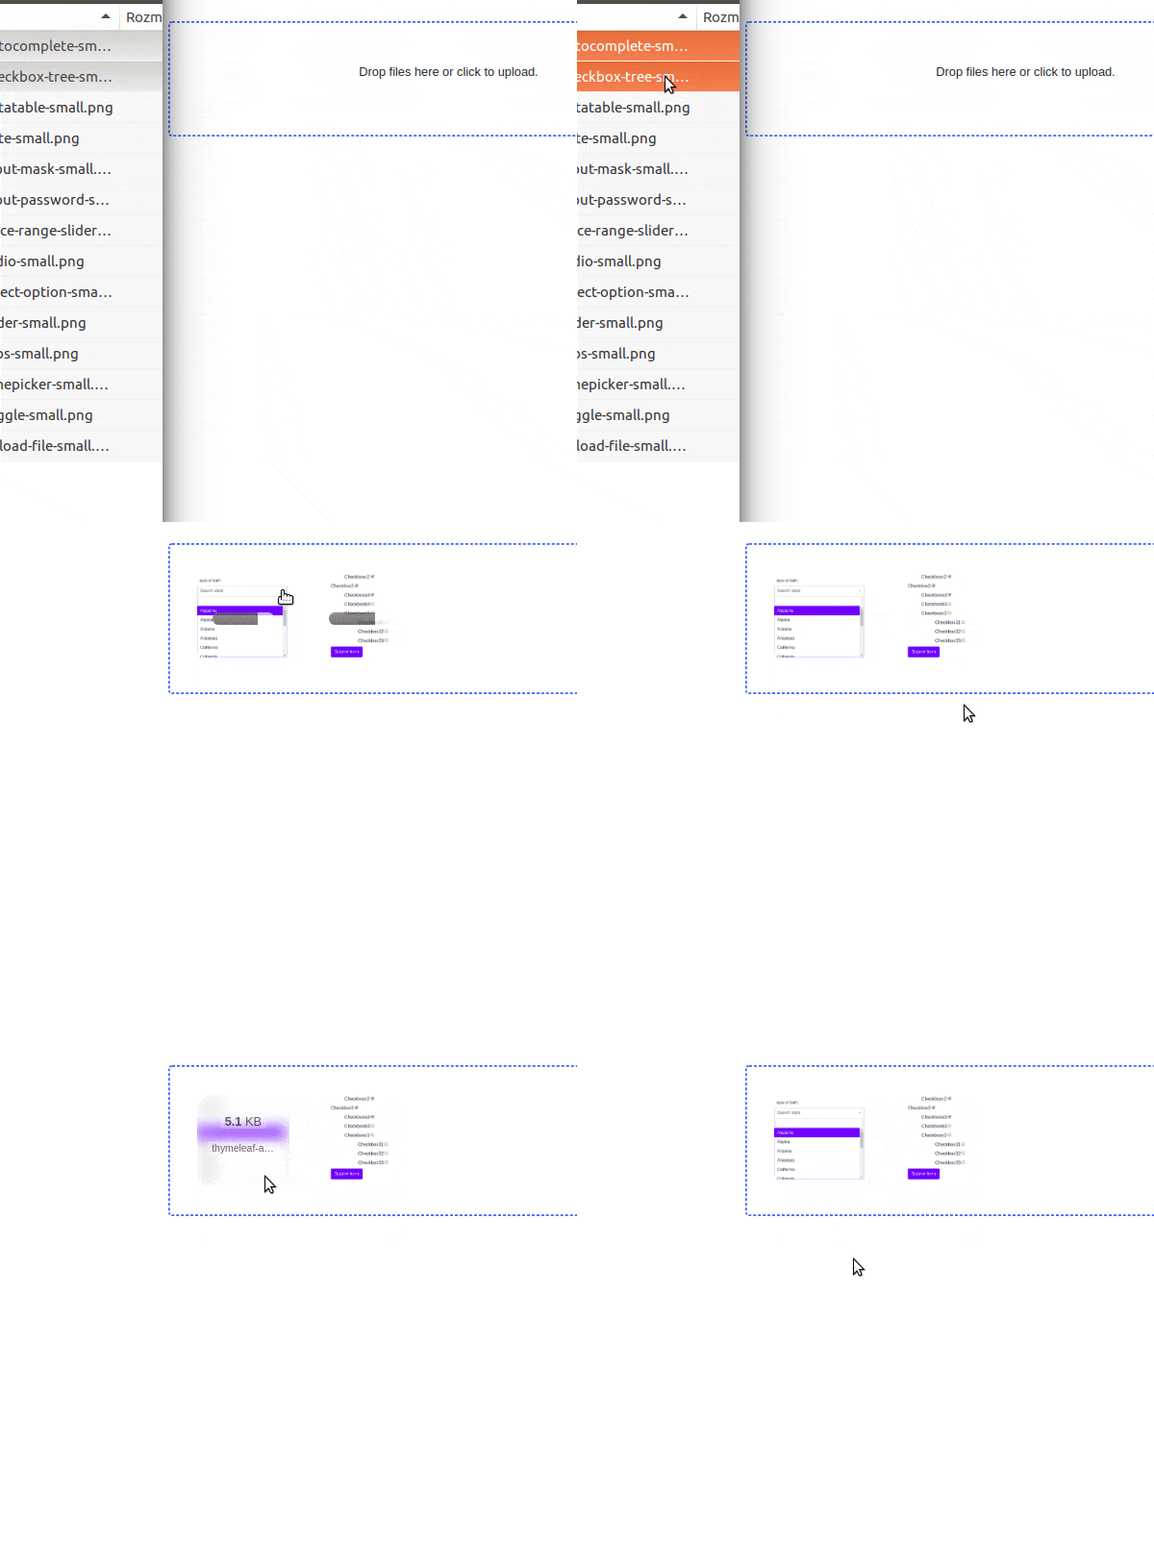
The running application is available under http://locahost:8080 URL and presents the following functionality:

6. Conclusion
In this article, we presented how to create Thymeleaf Drop File Area using dropzonejs library and Thymeleaf form. We created a simple REST controller that handles all uploadings.
As usual, the code used in this article is available under our GitHub repository.
{{ 'Comments (%count%)' | trans {count:count} }}
{{ 'Comments are closed.' | trans }}